SIZING GUIDE
To ensure the most accurate gauge of your finger size, you should use a proper ring sizer— if not mine, then one at a jewelry store local to you, or simply buy one online; you’ll be amazed how handy it is to own. If you are not in the United States, make sure you take note of what nationality sizer you use, so as to avoid a miscommunication.
As for how to size yourself, it’s best to do so at the end of the day, when blood flow and temperature in your finger has had time to acclimate. Don’t measure your finger when it is cold, as it will have shrunk considerably; conversely, don’t measure it when it’s very warm, as your finger will be slightly larger than normal. Because your finger size will fluctuate over the course of a day or even over the month depending on water retention, it’s ideal to measure your finger at a few different points over a period of time, to get the most accurate average. Keep in mind, not all rings need to be worn on the traditional “ring finger;” for various reasons, you may find it more comfortable to wear a ring on an alternate finger.
If the ring is intended as a surprise for someone else, determining the correct size will be a challenge-- but essential. You may be able to sneak off with one of her rings to size it at a jewelry store. However, if this is to be an engagement ring, the ring really should be one that she wears on her traditional ring finger, to gauge the correct size; a ring that fits comfortably on the index finger or on the right hand may be too large on her ring finger. If you can’t sneak off to a jewelry store to have the ring sized, you may take one of her rings and slide it down a tapered candlestick, pushing it down as snugly as it can go without damaging the wax. Take a thin, permanent, black pen to the candlestick and carefully trace around the top and bottom edges of the ring. Then send me either the entire candlestick or simply cut off the section where it’s marked, so that I can gauge her size.
When in doubt, I encourage people to size their finger marginally smaller rather than larger. If necessary, it’s usually not too difficult to stretch a ring slightly bigger, whereas making it smaller can entail a lot more labor. I will resize most rings for a $20-$80 fee, depending on how complicated it is (if there is engraving, gemstones, or a large size differential). Feel free to contact me with your sizing questions or concerns.
USING THE SIZING CHART
If you absolutely cannot find a jewelry store or buy a ring sizer to get yourself sized, you may try the following chart as a guide. Keep in mind, however, that the chart will help determine the circumference of the finger at the base, but the knuckle is what makes sizing so tricky. What's comfortable on the base of the finger may be painful to slide over the knuckle if it’s large. In this case, a paper or even flexible plastic ring sizer will be of little use, and only a proper sizing with a rigid plastic or metal ring sizer will work.
|
CIRCUMFERENCE (in mm ) |
U.K. |
U.S. |
DIAMETER (in mm ) |
JAPANESE |
|
46.5mm |
H 1/2 |
4 1/2 |
14.8mm |
7 |
|
48mm |
I 1/2 |
5 |
15.2mm |
8 |
|
49mm |
J 1/2 |
5 1/2 |
15.6mm |
9 |
|
50.5mm |
L |
6 |
16mm |
10 |
|
52mm |
M |
6 1/2 |
16.4mm |
12 |
|
53mm |
N |
7 |
16.8mm |
13 |
|
54.5mm |
O |
7 1/2 |
17.3mm |
14 |
|
55.5mm |
P |
8 |
17.7mm |
15 |
|
57mm |
Q |
8 1/2 |
18.1mm |
16 |
|
58mm |
Q 1/2 |
9 |
18.5mm |
17 |
|
59.5mm |
R 1/2 |
9 1/2 |
18.9mm |
18 |
|
61mm |
S 1/2 |
10 |
19.3mm |
20 |
|
62mm |
T 1/2 |
10 1/2 |
19.7mm |
21 |
|
63.5mm |
U 1/2 |
11 |
20.1mm |
22 |
|
64.5mm |
V 1/2 |
11 1/2 |
20.6mm |
24 |
|
66mm |
W 1/2 |
12 |
21mm |
25 |
|
67.5mm |
Y |
12 1/2 |
21.4mm |
26 |
|
68.5mm |
Z |
13 |
21.8mm |
27 |
|
70mm |
Z+1 |
13 1/2 |
22.2mm |
28 |
|
71mm |
Z+2 |
14 |
22.6mm |
29 |
|
72.5mm |
Z+3 |
14 1/2 |
23mm |
31 |
|
74mm |
Z+4 |
15 |
23.4mm |
32 |
You can use the conversion chart above by taking a thin strip of paper and wrapping it around the base of the appropriate finger. Carefully mark with a thin pen the point where it overlaps to form a complete circle (you may find it helpful to have a friend steady the paper or mark it). Measure the length from the starting end of the paper to the pen mark in millimeters to determine your finger circumference; then use the size conversion chart to identify your U.S. ring size.
USING A PAPER RING SIZER
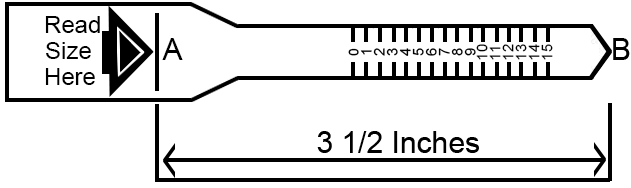
You may also print out this paper ring sizer. Just make sure that the size is accurately represented by measuring it with a ruler: from A to B, it should measure exactly 3 1/2 inches long. After you've ensured that the ring sizer measures exactly 3 1/2 inches long from A to B, cut it out and follow these steps:
- With a pen knife, cut a slit in line "A"
- With the numbers facing out, wrap the sizer around the base of the finger on which you'd like to wear the ring.
- Gently guide the pointed end "B" through the slot you've cut for "A," until the sizer is as tight as you can make it, but making allowance for it to slide over your knuckle. This is a tricky estimation to make, but do your best.
- The number aligned with the tip of the pointed end of "B" should be your ring size. If the tip ends halfway between two numbers, then your finger size is a half size. For example, if it goes to halfway between 8 and 9, then the correct size is 8 ½.>
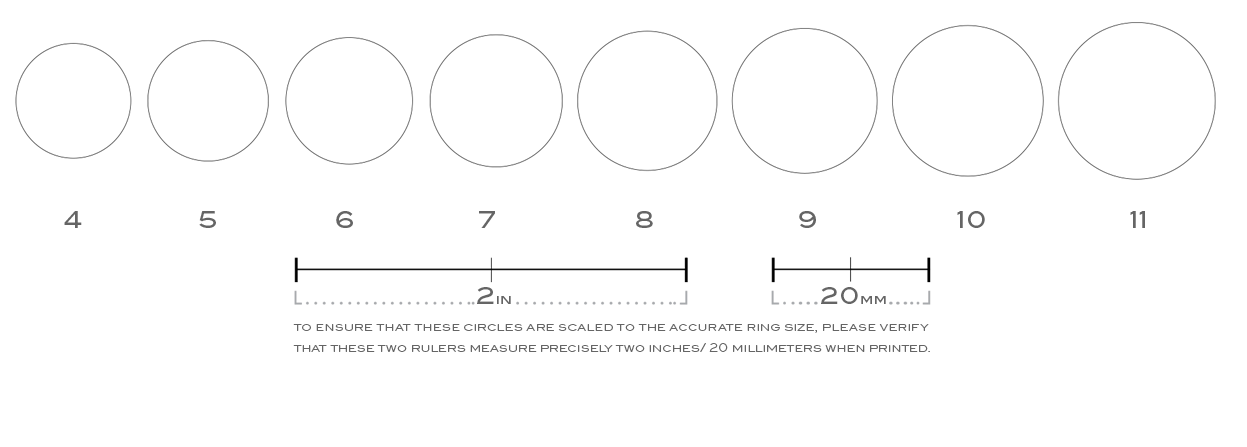
ESTIMATE YOUR RING SIZE ON PAPER
If using the paper ring sizer, I recommend confirming your results with another method so that you are as accurate as possible. If your attempts yield conflicting results, you may opt to buy yourself a metal or plastic ring sizer, or visit any local jewelry store to get yourself professionally sized.
Print this page and lay one of your rings (one that fits your ring finger) on the circle that aligns with the inside of your ring. To affirm that this page is printed to scale, please verify that the two rulers below measure precisely two inches / 20 millimeters across. If your ring falls between two of the circles, you are a half size
)